Unleash your potential for a vibrant life with a 21-year-old aspiring dietitian, skincare junkie, and passionate entrepreneur from Houston, TX. Embarking on a holistic journey, I'll guide you towards a healthier, more positive existence. Discover the transformative power of nutrition, skincare, and an unwavering spirit. Join me as we create a masterpiece of vitality and fulfillment, one day at a time. Let's embrace radiant health and unlimited success together!
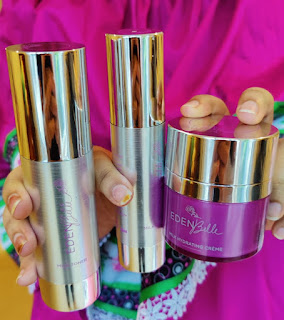
DISCLAIMER: Everyone's skin is different. My opinions are just that; they are not cold, hard facts. What works for me may not work for you and vice versa, but I write these reviews to give you a detailed perspective before you go around spending your money everywhere. This skincare trio by Edenbelle Beauty is a milk-based product line consisting of lactic acid formulas to provide gentle chemical exfoliation and brightening of the skin. I found this skincare line in an ad when this company had just recently launched these products and/or packaging and was looking for people to try it out and complete a survey. The total value of these three products was $125, but all I had to do was pay $7 shipping. $7 for an entire full-size skincare trio is an absolute steal! In fact, I was skeptical because there's no way it will be good if I'm getting it for this cheap. But I'll be honest; this was one of my best skin care experiences. It was so much fun to use these products, and th...
Get link
Facebook
X
Pinterest
Email
Other Apps
Coasters made from Upcycled Plastic Grocery Bags
Get link
Facebook
X
Pinterest
Email
Other Apps
It's no news
that humans' overconsumption of our planet's natural resources is taking a
toll on it. And it is up to us to do whatever we can to slow that down or stop
it. I'm talking about reducing plastic usage and waste production, reusing
whatever plastics we have already used, and then recycling it once it can't be
used anymore. The three R's aren't just for plastic; they're for anything. But
right now, we're going to talk about plastic. Specifically plastic bags. No
matter how hard you try to take your big tote bag to the grocery store, you
always come back with some plastic bags. So, what if I told you
there are countless DIYs that are so quick and easy that even the busiest of
people can give their minds to rest while doing these. What we are going to talk
about today is coasters made from plastic grocery bags.
I looked around for a DIY craft I could do with my friends for quite a while, and this was my favorite one. I found a tutorial on creativejewishmom.com, tried it out to see if it worked, and fell in love. Here are the instructions, plus more tips and tricks I wish I had before I started.
The materials
you'll need are:
plastic grocery bags,
scissors,
two scratch pieces of paper,
and
an iron.
Having any paint, markers, or other decorative materials is optional.
Make sure you are in a well-ventilated area to protect yourself from any
plastic fumes that may occur. I just opened all the windows in the room that I
was doing it in. You can also go outside and do it; if you have a large room, that should be okay, too.
Procedure:
The first
step is to take your plastic bags and cut the handles off them. This will help
you get a nice square canvas. Then you want to take your plastic bags, which
should now be relatively square-shaped, and fold them into fours. You will do
this with about three or four bags, depending on the desired coaster thickness and how thin the bags are.
Afterward,
you want to place one piece of paper on a flat surface that you can iron on,
place the folded plastic bags on the article, and cover the bags with the second
piece of paper, ensuring no plastic is peeking out. The two pieces of paper protect the ironing board and the iron itself from the melting
plastic.
Immediately
following, you will heat the iron to the highest level and slowly
start running it over the paper. You want to take your time and slowly
and carefully spread the heat evenly over all parts of the paper's surface. This heat will help the plastic melt and fuse, creating a more rigid plastic material perfect for a coaster. You can occasionally lift it up from the
corner to check if it's melted and appropriately hardened.
Around 1 to 2
minutes later, you can stop ironing and wait a few seconds for the paper to
cool before peeling both layers away from the plastic. This step is crucial because you must be careful that the form doesn't stick to
the plastic. Try peeling both pieces off simultaneously because often, if you only peel one paper off, the plastic starts curling in that direction, and it's
not as flat as it should be anymore. It might take a couple tries, but once you get
the hang of it, it should be a piece of cake.
Once you've
separated the plastic from the paper, you can use a stencil or something to cut out the plastic to your desired shape. You can do hearts or stars
or stick to the basic circles and squares. Depending on how big your piece
of plastic is and what size you want, you should be able to get anywhere
from one to three coasters out of it.
Finally, you
can start decorating. If your plastic bag is beautifully decorated and
you want to leave it the way it is, that's totally up to you. But if
there are a lot of random words and colors that just end up looking like a
big mess, then the best thing to do would be to use some acrylic paints to slap
on a base coat and then maybe use some puffy fabric paints to write words or
draw some shapes over it. You can even paint on stripes and polka dots with acrylic paint or do whatever floats your boat!
Alas, you can
enjoy your drink. I like to use my coasters to protect all of the waterfalls that come from the condensation of my iced coffees, and I also like to use
them to protect the wood from hot mugs when I'm drinking tea and things like
that.
This is a
perfect DIY activity to do with family and friends. It doesn't even take more than half an hour. My family and I usually reuse plastic bags as often as possible. Still, once they rip and can't hold anything,
this coaster is a perfect way to fuse the plastic back together and
upcycle it into something completely new. You can revamp your pantry
and all your rooms, giving every table its coaster. It was one of my favorite DIYs, and I loved helping the planet simultaneously rather than creating waste.
Let me know down below if you liked this DIY and if you try it out! I'd love to see what you think!
Please show me support by clicking below to follow all my socials and get access to some amazing discounts! 👇
DISCLAIMER: everyone's skin is different. My opinions are just that; they are not cold, hard facts. What works for me may not work for you and vice versa, but I write these reviews to give you a detailed perspective before you go around spending your money everywhere. All-natural skincare has been all the rage out there recently. Still, it's not easy to find skincare brands that can be trusted to have science-backed formulas that work and are worth the money rather than being over-glorified DIYs that can either be useless in protecting the skin or are often harmful. Any dermatologist will tell you to stay away from companies claiming to have all-natural formulas because when we turn to skincare, we are trying to fight what nature is doing to our skin. So, I set out to find what I thought could be the "correct" version of all-natural. A formula that avoids carcinogens, harmful synthetic compounds, and harsh chemicals. Now, I emphasize the word po...
Hi! I don't know how to go about this blog. Still, I want the main focus of it to be all-natural beauty, home remedies for skincare, health and wellness tips, healthy, wholesome, and whole recipes, and much more for a healthy and happy lifestyle! I will be trying out different brands and products and doing reviews for those unsure whether they want to go through with their purchase. As we are all going through this current global virus pandemic together, I have gotten a chance to educate myself on the things happening in the world and in future career options. I should have started this blog long ago, as soon as the stay-at-home order was implemented, but I was too focused on other things. I am right now, too, but if this blog is something I want to do, then I should start now. Otherwise, it'll never happen. I study overseas in Nairobi, Kenya, at an Arabic Academy called Al Jamea tus Saifiyah. It is my fifth year at the University, but I am, of co...
DISCLAIMER: Everyone's skin is different. My opinions are just that; they are not cold, hard facts. What works for me may not work for you and vice versa, but I write these reviews to give you a detailed perspective before you go around spending your money everywhere. I had heard about CeraVe as an excellent drugstore brand for a while and wanted to get my hands on some products. As it turns out, I came across a giveaway ad on Cerave's Instagram, and all I had to do to enter was give them my email and do a little survey regarding my skin type (they were giving away all of their different lines) Once I received the package in the mail, I was so excited to rip into the products and use them, but at the time, I was just finishing up Luminance and was about to start using Fleur and Bee (which I talked about in my last blog post if you want to go check that out) So it was quite a while before I actually started using CeraVe. I did post my first impressions on my IG a...


.jpg)
Comments
Post a Comment